Sharp logo
MZ-800 Emulator 
( written by Zdenìk Adler )  


The emulator can be used for a various circle of users: programmers will enjoy a lot of useful features like assembler, disassembler, testing features, whereas users who enjoy the games running on an original MZ-800 will find all games written in Basic or written in the machine language very good emulated on the PC.

The multilinguial emulator version works under Windows 9x / ME / NT 4 / NT 5. A version running under plain DOS is available too ( English and Czech version ).

You'll see some of the screens here, so you're able to get a good overview of all functions and features.

Getting started

Register screen
The first window allows you to register the emulator or to test it for 5 minutes for each run. This means, after 5 Minutes you must restart the emulator and again, you have the next 5 minutes and so on.

You can pay to the author 10 US-Dollars. To this contact the author by e-mail to get back by an e-mail from the author a "key.reg"-file which enables you to register the emulator and then you have unlimited access to the emulator.

The demo version is unable to do a memory snapshot ( MZS ), that means: you cannot save system memory, registers etc... ( as *.SNA or *.Z80 at ZX emulators... ) by the demo version.

The Virtual CMT

MZ-800 emulator screen
The MZ-800 emulator screen enables you to execute the data recorder or the monitor program. The monitor program supports all known MZ-800 monitor functions.

While the monitor is active type "L" followed by the CR-key or "LOAD" while a Basic is active to load a program. The MZ will wait for a file to load. Now select Hardware, Virtual CMT and then press the OPEN-button at the next window opened by the Virtual CMT. You can select now a MZ-file ( M12 or MZF ) from your harddisk, i.e."1Z-016.mzf" ( WAV-files and ZX Spectrum tapefiles are supported too by the emulator ). BIN-files ( MZ-80 ) will be supported in a future version.
File selection screen from virtual CMT
Note Before trying the procedure described above,
enable the check box "Enable CMT patch in ROM" in the Tape-Setup tab.

Note You can select file types and hard drives by this window.
Next press the Play-button at the Virtual CMT.
Virtual CMT screen
You'll see the progress of the load process by a green extending line in the right window just under the file name. If the load process is ready the Basic or the monitor will inform you as known. A machine language program ( e.g. a game ) can automatically start as known.
You can save programs by the virtual CMT using the ( red ) Record-button. Select the drive and the name of the file. Data will be written into a WAV-file and can be reloaded too by the virtual CMT.

To activate the Virtual CMT uncheck "Enable CMT patch in ROM" by selecting Hardware / Setup / Tape. But you don't do if your program uses an own loader ( i.e. Turbo Loader, OPENING 800 which uses a DATA-file without a tape header loaded by an internal Basic command ). In this case the ROM isn't patched by the emulator and the program's own load routine is used instead of the loader of the monitor ROM.
The tape setup screen
Other Baud values are selectable for a compatibility of Turbo Copy and Turbo Loader programs.


Note You can connect your MZ to the soundcard to load programs from PC to MZ and vice versa.

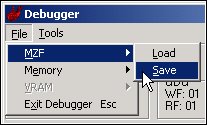
Load / Save by the debugger

You can save or load MZF-files by the debugger too. Use this for debugging purposes or if you want to load a program at a specific address other than specified in the file-header.
Debugger MZF-file functions
To load select the file and you're able to change the addresses from the tape file information or simple accept these information. Changing the values allows you to change the load address, execution address, and the size of the file if you want to load a part of the file only. To this the emulator opens a Load MZF file window.

For save you can save a MZF-file selecting the address range of the data / program to be stored, the execution address, the file name, and a comment can be stored into the tape header.
Tape header information for MZF-file save function

You can load a binary file by the debugger's menu item "Memory".

Floppy interface

You can load or save programs by the emulator's floppy interface. To this activate the floppy first in the Floppy Disk Setup screen.
Enable the FDD
Now reset the emulator by pressing the F12 key. The initial monitor screen appears:
FDD Monitor
Now select a DSK formatted file ( suffixed by .DSK ) for execution by the MZ emulator. This is a disk-image written by CPDREAD. You can download this tool to create your own disk-images and you can download a second tool CPDWRITE to create a new disk from such disk-image which then can be used by your MZ ( 80K, 80A, 700, 800, 1200, 1500 ). Download the utilities CPDREAD ( 9 kb ) and CPDWRITE ( 16 kb ) now.

Note You can select your HD floppy drive ( normally drive A: ) with 1.44Mb if the floppy disk inserted contains one or more DSK-formatted files !


To this press the disk button at the toolbar and by the next window ( not shown ) you can choose the path and the name of your DSK formatted file to execute ( i.e. Lemmi1.dsk ).
FDD open image file
To end a program choose Eject and reset the emulator by pressing the F12 key.
Lemmings

Floppy Disk Tools

There are 3 ways to start the disk tools which use DSK-formatted images by CPDREAD. You can download this tool to create your own disk-images and you can download a second tool CPDWRITE to create a new disk from such disk-image which then can be used by your MZ ( 80K, 80A, 700, 800, 1200, 1500 ). Download the utilities CPDREAD ( 9 kb ) and CPDWRITE ( 16 kb ) now.

Start the disk tools from the floppy setup panel
1. Starting the disk tools from the setup panel.

or start the disk tools from the disk button in the toolbar  
2. Starting the disk tools from the disk button in the toolbar

or start the disk tools from the tool menu  
3. Starting the disk tools from the tool menu

The disk structure information panel appears first and shows for the selected disk side the number of tracks, sectors / track, the number of bad sectors, and unformatted space:

The disk structure information panel
( The size of the disk tools panels is reduced to 70% )

The meaning of this panel is shown in a help panel by using the "? Legend"-button:

The help panel to the disk structure panel

You can extract files from the disk by using the "File transfer"-tab. The directory is shown ( select CP/M LEC, P-CP/M80, or the Disk Basic MZ-2Z046 ). You can set "Autodetect" which tries to detect the type of the disk automatically.

The directory and the extract file selection panel

To extract files mark them as known then press the Extract-button. You can change in the following window ( not shown here ) the filename, pathname, etc. The files will be converted into MZF-formatted files.

Selecting files for extraction

You can extract the IPLRO too ( if any ) which is shown never by any directory-display.

Selecting the IPLPRO for extraction

The tab "General info" informs you about some attributes of the disk.

The general info panel

This is a Beta-test-version. Please report bugs or any hints to the author.

QuickDisk access

You can load and save programs by the emulator's QuickDisk interface. To this activate the QuickDisk first in the QD Setup screen.
Setup for the QuickDisk drive

Now select a QD-formatted file ( suffixed by .MZQ or .QD ) by the "Open file"-button for the execution by the emulator or create a new QD by the "Create new"-button. Write protect the disk if necessary. Eject the QD if it is no longer used and reset the emulator by pressing the F12 key.

Now reset the emulator by pressing the F12 key. The initial monitor screen appears if the first file on the QD cannot be loaded ( e.g. a BTX-Basic-file ). If the first file on the QD is an OBJ-file then it will be automatically started by the monitor's auto-boot-function.

File format converter

A converter enables you to convert between the formats MZF, WAV, and BIN.

Invoke the format converter

Invoke the format converter as shown
above. Choose the converter function
needed and press Convert.
( i.e. convert from MZF to WAV ).
Activate the format converter

The next and following window ( not shown here ) lets you choose the path and the MZF file for conversion and the next window will enable you to set the path and the output file name ( i.e. a WAV file ). If the converter finished his work you will get the following information:
Conversion completion of MZF to WAV
If you want to convert a WAV file into MZF format then choose the converter function
WAV -> MZF and again choose the input WAV file and give an output file name for the MZF format. After completion of the converter you will get the following information.
Concersion completion of WAV to MZF
You can convert MZF to BIN too and vice versa by the new version and you can convert a BIN formatted file into a WAV file by the execution of two steps:

1. BIN -> MZF
2. MZF -> WAV or vice versa ( WAV to BIN )

Integrated assembler / disassembler

The debugger allows you to assemble and to disassemble.
You can load a file and then you can disassemble the loaded file or any other area in the MZ-800 memories.
You can save the disassembled output to a TXT-file on disk.
The disassembler

Integrated Z80 debugger

You can use the debugger to test your machine language programs. To this you can see your program work by showing you continuously the disassembled instructions, the registers, and the flags.
You can set a break point to stop the program at each point.
You can stop the program by a stop button to set the registers and the flags at each time. Double click on the register which contents you want to change, change it in the next window opened by the emulator and then use the run key or the single step key to let the program continue his work with the changed register contents and / or the changed flags, if you have changed the flags too.
You can step by step see your program work using the single step button or the F7-key.

This is a good way to test your program and for beginners a good way too to learn programming the Z80 machine code language. Stepping through the own program will show you how the program works, what each instruction does by watching the flags, memory, stack, and register contents.

If you're one of those who don't know anything about SHARPs MZ's:
Well, use only this emulator for learning programming the Z80 ;-) To this you have not to buy any expensive hardware tool.
The debugger window
You can open the stack window to see the contents of the stack or you open the memory dump window to see the contents of the RAM from $0000 to $FFFF.
The contents of the stack The memory dump window
There are two ways to set a break point:
While in debugger stop the program by the Stop button, then right click on a disassembled instruction.
Set a breakpoint
Or use the debugger's Break button and insert a break point address into the next window opened by the debugger.
Set a breakpoint. 2nd way
You can change any instruction. While in debugger mode press the Stop button and type in any key. Now an inline assembler window is opened . This enables you to type in an instruction which is to be replaced.
Inline Assembler

Screen shots

You can load or save a screen shot by a file name. The file is BMP-formatted.
The screenshot tool

Virtual Keyboard

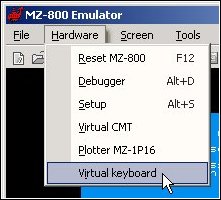
You can use a virtual keyboard by your mouse.

The virtual keyboard

You cannot use both the normal keyboard and the virtual keyboard. To activate the virtual keyboard select the following item:

Activation of the virtual keyboard

To use the Shift key of the virtual keyboard hold down the Shift key at your PC keyboard then click on the Shift key of the virtual keyboard. Next click on the second key you want and then release the Shift key of your PC keyboard.

The setup settings

The Setup windows allows you to set and to control a lot of functions.

Setup for the CPU speed
Setup parameters for the ROM / RAM

Setup parameters for video
You can change the screen colors to green or greyscale.

Screen mode green Screen mode greyscale
Setup parameters for audio
Setup parameters for input
Miscellaneous setup parameters
Note Set the MZ-800 DIP switch to the desired mode: MZ-700 mode or MZ-800 mode.

The emulator supports the following languages for messages, selection box etc.:

Supported languages by the emulator

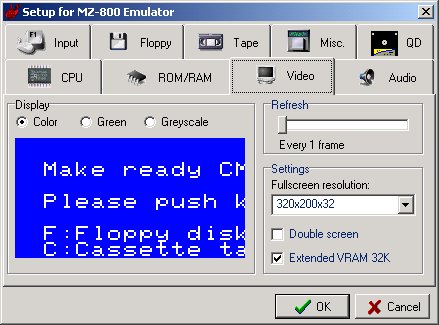
Further miscellaneous settings

You can control the screen size of the emulator window, choose the color or black / white view, and the refresh interval.

Setup for the screen size
Setup for the color mode
Setup for the refresh interval

The about screen
Visit author's homepage Email to author

What's new in Version 0.075 ?

The plotter MZ-1P16 is now full supported.

Activate the plotter by one of the following methods:

Activate plotter by buttonPlotter activation by pulldown menu

The plotter window will be opened:
Plotter output screen
The three buttons enable you:

- to save the plotter output as a bitmap file
- to reset the plotter ( by this the previous plotted output is lost if not saved )
- to feed the paper

The status line at the bottom of the window show the actual X- and Y -positions and the status of the plotter ( busy etc. ).

These are sample plotouts; the first is done by the MZ-700 plotter demo program written in S-BASIC:
Plotout example
Plotout example
Plotout examples ( Lissajous )

Version 0.076 news:

The emulator supports now a mouse emulation.

Download an application for MZ's to test the mouse ( 11 kb, Czech version ).

Version 0.084 news:

The setup is completely new designed. Buttons to accept ( OK ) or CANCEL the setup modifications are added.

New features are:

- Emulation of a green and greyscale screen
- The sound generation is completely rewritten and supports now a volume control and the noise emulation
- The debugger's breakpoint mode is tuned up for a high performance while using breakpoints.

Version 0.085 news:

The QuickDisk drive MZ-1F11 and its interface is now supported by the emulator.

Version 0.087 news:

The author has added disk tools to the emulator. See the description and screenshots about the disk tools above.

Version 0.091 news:

- Emulation of two undocumented graphic modes ( 3 and 7 )
- Higher performance for the CPU and sound synchronization
- Improved speed of scanline screen emulation ( scanline caching )
- Faster keyboard scans
- Error correction for loading MZF files from the command prompt
- Virtual keyboard

Version 0.091_2 news:

- The Shift key of the Virtual Keyboard is now activated.
- A much more comfortable usage of the file selection screen of the Virtual CMT / Debugger Load.
- Bugs fixed and improved speed of the emulator.
- "Save now" option added at the floppy selection menu.

Version 0.092 news

- The emulator supports drag & drop for MZF- and MZS-files
- code optimizations which improve the emulation speed

Version 0.095 news ( beta test version )

- New design of the virtual CMT
- The emulator supports the floppy HD drive A: if the 1.44Mb floppy disk inserted contains one or more DSK-formatted files.
- errors of the PIT 8253 emulation corrected
- Japanese language support in progress (unfinished)

Version 0.096 news (19.6.2003)

No news available.
(Note: The copyright screen shows incorrect information for this (last?) version: URL and version number.)

Version 0.097 news (29.3.2006)

An unpublished and precompiled version on disk found by the author after a long time. The project will be continued next.

Please take a kindly note of the author's site.


Download

You can download now:

- The DOS version ( Czech ) from the author's server ( ZIP-file 64 kb )
- The DOS version ( English ) from the author's server ( ZIP-file 55 kb )
- The demo version you saw above (multilingual: Czech, Slovenian, English, German, Italian, Japanese). It will run under Win 9x / ME / NT 4 / NT 5 ( ZIP-file 504 kb )
Note ! It is strictly forbidden by the author to copy the emulators to other servers for download services !

Unzip the file into a directory.

Download ( 14kb ) and unzip the needed ROM-files into the ROM-directory. The emulator is ready for work after setting up all for your own purposes. Use the Japanese character ROM or the European character ROM by selecting it from the emulator's Setup menu ( Hardware / Setup / ROM / RAM / CGROM ).

Please contact the author for registering and support.

Note ! It is strictly forbidden by the author to copy the emulators to other servers for download services !


Number of visitors


Go to the top of this page Home

last updated April 5, 2006
sharpmz@sharpmz.org

khmweb barrierefreies webdesign Berchtesgaden