
MZ-1T01 data recorder
( Operating instructions )
|
|
General
The MZ-1T01 data recorder is inbuilt in MZ-731 and MZ-721 only, but
you can easily add one to your MZ-711 subsequently.

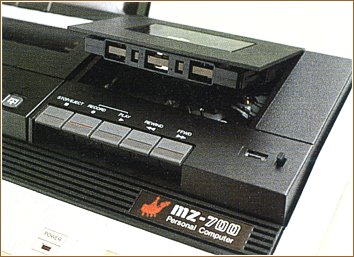
The MZ-1T01 can be operated like a common audio recorder.
| Button |
Function |
| RECORD |
to save a program or data |
| PLAY |
to load a program or data |
| REWIND |
to rewind the tape |
| FFWD |
to forward the tape |
| STOP/EJECT |
to stop the tape and that deactivates
all active buttons. If no button is active the cassette will
be ejected by pressing this button |
|
|
The buttons of the data recorder
|
 Write down the tape counter value after saving for later use. This will
enable you to easily find the point for a new SAVE or a LOAD. The reset
key sets the tape counter to 000. Use it when you start a cassette from
its beginning.
Write down the tape counter value after saving for later use. This will
enable you to easily find the point for a new SAVE or a LOAD. The reset
key sets the tape counter to 000. Use it when you start a cassette from
its beginning.
 |
|
For best results use normal tapes ( Fe ) with capacities up to
a maximum of 60 minutes ( C30 - C 60 ). Tapes with capacities
more than 60 minutes are thin and can result in read errors by
deforming during the age.
|
|
| MZ-1T01 Service |
|
RECORD / FAST FORWARD / REWIND torque measurements
|
- Set the torque instrument on the cassette tape recorder.
- Torque value under each mode must be as follows:
| Position |
Torque measuring cassette |
Value |
| PLAYBACK |
TW-2111 |
30~ 70gram / cm |
| FAST FORWARD |
TW-2231 |
60~ 160gram / cm |
| REWIND |
TW-2231 |
60~ 160gram / cm |
|
| Record / playback head azimuth adjustment |
 |
|
- Set the instrument as shown.
- Plaback the test tape ( Teac's MTT111, recorded with 3KHz
signals ).
- Adjust the head azimuth adjusting screw so that the reading
on the digital voltmeter is at its maximum value.
|
|
|
Cleaning of head
|
 |
|
The head is critical for a proper performance of the tape recorder.
Dust on the head, capstan, pinch roller, etc. impedes proper recording
and playback.
Open the cassette holder, take out the tape, push down the PLAYBACK
pushbutton, then clean those components. If you can see any oxide
deposit, clean them using a cutton bud damped with alcohol.
|
|
|
RECORD pushbutton can not be pushed in
|
The RECORD pushbutton can not be pushed in, if the erasure protect tab
of the cassette tape is broken. Forcible depression of the button may
result in machine failure.
|
|
Tape speed adjustment
|
- Connect the wow-flutter measuring instrument to #8 pin of the
CNW3001 connector.
- Playback the testtape ( UKOG-0119CSZZ, MTT-113 recorded with 8KHz
signals ). Use the middle part of the tape for test.
- Adjust the semi-fixed resistor located on the Motor Board so that
the playback frequency should become 8000 ± 250Hz.
|
| Using other types of recorders externally |
|
You can use each other audio recorder or data recorder if no MZ-1T01
is available ( e.g. MZ-711 ). To this you need a known stereo audio
cable with cinch connectors mounted at the ends of the cable. Connect
the following plugs:
|
from audio recorder
|
to MZ-700
|
|
MIC
|
WRITE
|
|
EAR
|
READ
|
 |
|
You'll find the plugs of the MZ-700 at his reverse side,
the plugs are labeled with READ and WRITE. |

Please take note of the following items:
1. The message " RECORD. PLAY" will never appear on the screen if you execute the
save process. Please press this button before you execute the save command.
Some recorders will have pressed the RECORD button and the PLAY button
coincidentally. The motor can't be controlled by the MZ-700, so you
have to press the STOP button at the end of the save process.
RECORD. PLAY" will never appear on the screen if you execute the
save process. Please press this button before you execute the save command.
Some recorders will have pressed the RECORD button and the PLAY button
coincidentally. The motor can't be controlled by the MZ-700, so you
have to press the STOP button at the end of the save process.
2. The message "
PLAY" will never appear on the screen if you execute the load process.
Please press this button before executing the load command. The motor
can't be controlled by the MZ-700, so you have to press the STOP button
at the end of the load process.
3. Adjust the volume control and the record control to high signals.
Set it to a little bit higher signals as you do for audio signals. May
be, audio recorder with an automatic control will not work properly.
| 4. Try to set the switch for the polarity
of the audio recorder's head to the alternate position of the switch
if it is not possible to load data / programs from the audio recorder.
To this, you must remove the MZ-1T01 by removing his two screws
at the backside of the MZ-700. |
 |

 |
5. Use the audio recorder that saved your data / programs to load the
data / programs. To prevent problems don't use different audio
recorders.
6. The programs saved by an audio recorder cannot be loaded by the
MZ-1T01.
The data recorder MZ-1T04 of the MZ-821 can be used too like the MZ-1T01
without any restrictions.
|
|
External recorder playback circuit
|
|
When the external recorder is used, connection is made with the 8255
by shorting P-12. In this condition, the write data ( 8255
PC output ) is differentiated and sent to the recorder.
In the case of read, the signal peak is chopped by D1 and D2 ( about
0.6V ), amplified in the 1.2V limiter ( about
1.2V ), then amplified to 5V in the next stage
amplifier. The phase of the read signal may be inverted with the
tape switch after this is to compensate for phase difference owing
to the head of the recorder.
When proper operation is not attained with an external recorder, adjust
the volume control and the tone control knobs to optimum positions.
Those which incorporate treble and base for tone control should preferable
be set to a flat condition, and those with only a tone control knob,
should be set to a high condition.
|
|
Additional technical information
|
|
Data transfer with the recorder is carried out via the
8255. The read data is sent out through port C1 and the write data
is received through the port C5.
The motor on / off control is carried out via the port C3 and that
activation of the motor is confirmed through the port C4. The signal
SENSE goes low when FF, REW, or PLAY pushbutton is pushed on the MZ-1T01.
For more details about the format of the data written to tape go to
the next page now.
|